The bad news is my blog has fallen off the super busy to-do list for the most part this month. The good news is that I've got plenty of projects to share in the coming new year! My embroidery machine has been practically smokin' and the sewing machine has gotten a bit of good use too. Santa visits are complete, travels are done, so now time to prepare home sweet home for the magical morning of Christmas. Merry Christmas and Happy New Year!!

Thursday, December 23, 2010
Wednesday, December 8, 2010
Deck the Halls

My favorite time of year to skim magazines is October thru December. I love finding new recipes to try and refreshing takes on holiday decor. I personally tend to stick to traditional styles, but by keeping my mind and eyes open, I usually find new twists that refresh my annual decor. This year I was drawn to several wreaths featured in Better Homes and Gardens.
Offset placement of simple accents spoke to me, so I headed to the craft store in search of decorative stems to update our usually WAY basic front door wreath. My favorite photo inspiration is inside the BHG mag (page 120 for you subscribers out there). The spray of winterberry looks so classic yet modern, and reminded me of my December wedding. Maybe one day I'll splurge for a fresh wreath, but for now I'm quite pleased with the updated look on our front door! And it cost me less than $4 - affordable stylish crafts are always a holiday treat!


Monday, December 6, 2010
Their joyful tone, to every home...will my 2010 Christmas cards happen?!
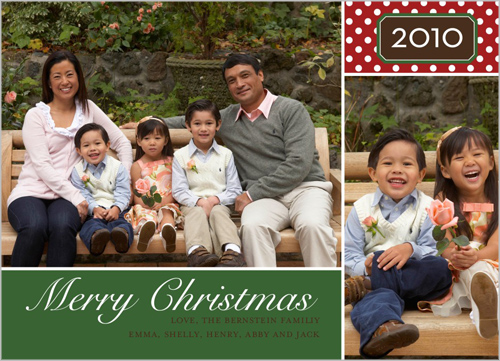
Much to my dismay, I have yet to create, order, address or send my Christmas cards. Please tell me I'm not the only one! We haven't received any yet, so perhaps I am not as far behind as I think and feel? I have been diligently decorating the house, crafting some homemade lovelies, and trying my best to stay on task during this busy season. I promise to share some of my crafty fun shortly, but for now Shutterfly has come to my holiday greeting rescue!*
I'm a big fan of all things personalized, and can't wait to get started with cards like these:


Speaking of further to-dos regarding photos, I started a new tradition a few years back of giving the grandparents photo calendars. They are always a big hit. And in true southern form, I'm a big advocate of thank you cards and notes. Wouldn't these be the cutest all winter long?!

Little boy saw Santa both Saturday and Sunday this weekend, so hopefully we scored at least one decent photo to use in our card. He proudly wore his holiday ensemble that I can't wait to reveal - stay tuned!!
*In full disclosure, I'm entering a Shutterfly promo for 50 free holiday photo cards. When I heard they were rewarding bloggers who share the love of personalized products, I was ready to face my self-inflicted annual card challenge!
Monday, November 22, 2010
Kicks, Crafts & Additions
 |
| photo courtesy of marthastewart.com |
Two of my favorite things combined last week...The Rockettes & Martha Stewart! I was overjoyed to see the girls open Martha's show and even stick around to craft with her. I proudly auditioned to be a high-kicking Rockette back in my dancing days, and would currently love to craft with Martha...a creative girl always has a dream, right?! Hop over to MarthaStewart.com if you missed the fun. The lobby of Radio City Music Hall even got the Martha treatment!
And with all of this talk about the Rockettes, it must officially be the holiday season. Is Thanksgiving really only 3 short days away?! At this point on the calendar, I usually have my son's holiday apparel stitched, pressed and hung waiting in the closet for holiday photos and events. This year the materials are still waiting for the magic to begin - aaaccckk! This mommie's got to get a move on. But my moves are a tad slower right now because baby #2 is baking away! It's been a rough 1st trimester, so I'm eager for some 2nd trimester relief. My mom will be visiting this week, so I'm thankful (as always!) for her cooking, crafting and decorating helping hands. Here's to kicking off my favorite time of year...and feeling some little baby kicks soon!
Sunday, November 7, 2010
Birthday Blanket
A preschool buddy invited us to party on the Fun Bus last month, so we just had to go and check it out. What a clever and great birthday party idea!
I always enjoy making gifts for said occasions, but with boys it can get tricky. Luckily I had this blank fleece blanket in my stash just asking for personalization!
I always enjoy making gifts for said occasions, but with boys it can get tricky. Luckily I had this blank fleece blanket in my stash just asking for personalization!

I used Monogram Wizard's Blackboard font. Cute for a boy I think!
My little guy loooves his many blankets. We have lots of favorites that mostly include those made by his great-grandmother. A flannel Thomas the Train print is the current snuggly of choice, but we rotate often. I hope the birthday fleece is proving to be cozy now that the weather is finally chilly!
Sunday, October 31, 2010
Happy Halloween!

Wow - how is the big day already here?! Unfortunately the second half of October has been a project-free zone due to a nasty virus circulating thru our abode. BOOooooo! Thankfully we all seem to be on the mend, and are looking forward to a fun evening of trick-or-treating. Little boy will be carrying his appliqued treat bag, mommie will be beaming with pride and daddy will be trying to stuff the bag full! Be safe and here's to many treats!
Thursday, October 7, 2010
Holiday Hand Towel
An adorable Halloween applique has been sitting on the back burner, so I grabbed a blank kitchen towel from my stash this week and got to stitching. I'm a sucker for a cute holiday hand towel. What do you think?!

The patch is from a new favorite source, Applique Cafe. I found the polka dot fabric at Hancock, and the white came from my stash - scraps from lining rompers...that my boy is now too tall to wear...sigh.

I'm excited to adorn my kitchen with some Halloween cheer. Luckily my "big" boy is beginning to enjoy the decor of the season as well, so here's to filling our house with more mommie made boo-tiful love!
Sunday, October 3, 2010
Girly Patch

I instantly fell in love with this patch over at Applique Cafe. It's so sweet and simple. Options galore!

I'll be adding tshirts to my etsy shop super soon. Time to get stitchin'!
Thursday, September 30, 2010
In with the New
Have you noticed my beautiful new banner return readers?! I am SO excited to have it up! My super talented friend, Maureen of AndersRuff, mastered it for me. She's the best! If you dig her style like I do, be sure to check out her Etsy shop and blog. Maureen and her biz partner Adria offer fantastic invitations, party supplies and more! She's a special lady and I'm grateful to have had her generous help - thank you Maureen!!!
And speaking of Etsy and new exciting things, I finally opened up my own shop: www.kathryncrafts.etsy.com! I'm just starting to fill up my space with inventory, so please take a look around and let me know should you be looking for something special. Check back often, and the blog will continue to highlight all things Crafts - personalized for the family, friends and beyond!
Sunday, September 26, 2010
Welcome Fall
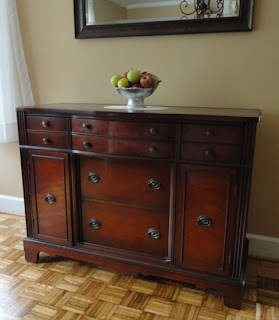
My posts have slowed down recently due to fall activities, but stay tuned for more mommie-made fun! Recently I took my little one apple picking and we had a blast. Here's a peek at some of our bountiful harvest:

This simple bowl of hand-picked fruit is the best souvenir! But we'll see how long these last as fall decor. There's nothing like apples fresh from the NC mountain trees!
Now I've got some girlie fun planned for this blank tee, plus a fun reveal. Check back soon!

Tuesday, September 14, 2010
Sweet Snowman
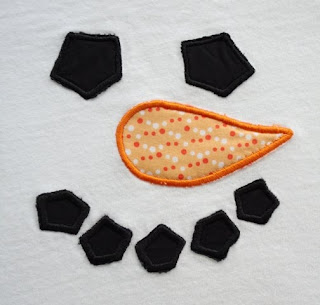
Summer is lingering way too long around these parts if you ask me! Luckily we are waking up to cooler mornings, but by lunch, the taste of fall is gone and summer makes an ugly return. I'm ready for fall leaves instead of dead crispy ones falling when the hot dry wind blows. So in an effort to keep (my) cool, I whipped up this little winter number for my boy:

I've been trying a different applique process other my norm, and officially decided after this stitch-out that I will return to my usual. Normally I stitch the applique outline on paper and cut out the fabric piece(s) by paper pattern(s). An alternate method is to stitch down small squares of fabric and then cut them closely to the stay seam with applique scissors before the final edging. I've definitely decided that I like prepping everything ahead of time, and then just going for it. It's less annoying to me and provides a tidier finish in my opinion. You never know until you try! (please pardon the shop talk non-applique-rs!)

I've been trying a different applique process other my norm, and officially decided after this stitch-out that I will return to my usual. Normally I stitch the applique outline on paper and cut out the fabric piece(s) by paper pattern(s). An alternate method is to stitch down small squares of fabric and then cut them closely to the stay seam with applique scissors before the final edging. I've definitely decided that I like prepping everything ahead of time, and then just going for it. It's less annoying to me and provides a tidier finish in my opinion. You never know until you try! (please pardon the shop talk non-applique-rs!)

The snowman face turned out a little more shabby chic than polished to me. And I think in his case, it works! I found him over at Planet Applique. Join their mailing list for monthly freebies that are super cute like this one. I can hardly wait for temperatures to drop enough to wear long sleeves again. Here's to a cool down - FAST ...and a little snow this winter wouldn't hurt one bit!
Wednesday, September 8, 2010
Trick-or-Treat Bag
So did you guess what I was putting on little boy's bag?!
 | |
| Hello jack-o-lantern! |
I had to remove the bag's side seam to accomodate my large embroidery hoop, so while the stitching's out I'm going to applique something fun to the back too! My son already loves his goodie bag and is practicing trick-or-treating around the house. Big smiles for this mommie! Final project pics to come.
ps - I found the cutie face over at Applique Cafe. So many adorable designs, so little time...sigh. Thank goodness preschool is back in session!
Sunday, September 5, 2010
Favorite Foods: Macaroni & Cheese
I don't know of one male (or even female for that matter!) in my family that doesn't love this Macaroni & Cheese recipe. This dish is a must share as it's requested often...birthdays, rainy days, chilly days, holidays...you get the picture! I always try to serve a green veggie with the Mac, and my Mom started the tradition of serving it alongside blueberry muffins. Sounds crazy, but the combo is soooo gooood! I think it's something about the savory and sweet together. Or maybe it's just the giant carb-fest we all crave from time-to-time. Whatever the case may be, it's delicious and I hope you enjoy it as much as our family does!

Macaroni & Cheese
8 oz cooked macaroni noodles
2 cups + shredded cheese
2 eggs
2 cups milk
salt, pepper, seasoning to taste
Whisk together eggs, milk and desired seasoning. Butter a casserole dish and cover the bottom with a layer of shredded cheese. Alternate layers of cooked noodles and cheese, ending with cheese on top. Pour liquid over entire casserole. Top it with a few small cubes of butter to assist in browning (and deliciousness). Bake in a 350 degree oven for 40-45 minutes. YUM!
I like to use sharp cheddar cheese, but am also known to mix it up with colby or other specialty cheeses. If you have a meat lover in your household, you could add ham or even sausage. This recipe delivers a casserole consistency and is definitely a southern delicacy. Don't forget to try it with blueberry muffins!
Wednesday, September 1, 2010
Sneak Peek: Treat Bag

I'm sooo excited to complete this project! It's been on my to-do list since last Halloween! I found the black & white gingham fabric over the weekend and purchased an applique file last night. Everything's washed, pressed and ready to go. Can you guess what will appear on the bag? Stay tuned!
Tuesday, August 31, 2010
Fancy Guest
Just wanted to share another personalized towel I made for my Mom awhile back. White towels really set off initials and monograms beautifully!


It's been a great summer, but I'm so ready for the hot weather to be closing out. Here's to Fall and all the fun it brings!
ps - my fellow "Friends" fans will appreciate the post title. It's from one of my (many) favorite episodes!
Tuesday, August 24, 2010
Birthdays & Brainstorms

Apologies for the recent lack of posts. The blog may be silent, but my creative brain is quite the opposite! I've been reading, researching and brainstorming my home embroidery business ideas. Inspiration has hit and I'm in the zone. ha ha My self-diagnosed OCD has me wanting to start this venture out just right so that I avoid as many obstacles as possible. I may finally be ready to do this thang - woo hoo!!
And now a few details about that present above. Remember my Paper Flowers? Well here's more proof of my "green" addiction - a birthday gift, for my Mom, wrapped in tissue and raffia all recycled from beautiful gifts given to our household. I even printed the card (free template found here!) on cardstock in my stash that was passed on to me by a friend. Beautiful frugal is a drug I just can't get enough of!
Here's to birthday wishes and making things happen!
Thursday, August 12, 2010
Bag Tags
With all of the back-to-school preparations buzzing, I thought I'd share the bag tags I made as favors for my son's 2nd birthday party. Bag tags are a GREAT favor because they are easy to make, inexpensive, can match any theme, and are totally functional.

I got this sweet idea from a fellow crafty mommie friend who made super cute tags a month prior for her son's birthday party favors. (keep reading for more about this creative chica and her adorable biz + freebie!) When I unexpectedly received matching blank calling cards alongside my order of party invitations, I knew just what I had to do!


I got this sweet idea from a fellow crafty mommie friend who made super cute tags a month prior for her son's birthday party favors. (keep reading for more about this creative chica and her adorable biz + freebie!) When I unexpectedly received matching blank calling cards alongside my order of party invitations, I knew just what I had to do!
Tag Construction:
I just so happened to have the green gingham scrapbook paper in my scrappin' stash. Then I found the adorable King Cool font at dafont.com. I liked that it was child-like and loosey-goosey similar to the train tracks! I printed out the kids' names and mommie phone numbers onto the gingham paper, then cut rectangles for the names on front, and circles for the mommie info on back. After gluing the personalized info onto the train calling cards, I laminated them at an office store. Once back home I cut them out and punched a hole in the side to add the ties. Done!

This post isn't complete without a BIG shout out to my crafty pal Maureen! We met years ago in a smocking class (the youngest 2 there - hee!), and have been fast friends ever since. Thanks Maureen for your constant inspiration, help and creativity! For super cute free bag tag printables, check out her terrific blog. And don't forget to cruise her Etsy store too: AndersRuff. Viva personalization!
Thursday, August 5, 2010
Paper Flowers

This "green" mommie really enjoys using recycled materials. For example, I keep almost all of our household's gift packaging, including bags, tissue paper, ribbons,... all for re-use. With August comes another year of school, so I thought I'd share a fun recycling project I made last school year for my son's preschool teachers. Would you have guessed that the beauties above were made from Victoria's Secret tissue paper?!

To make your own,
gather the following supplies:
gather the following supplies:
recycled tissue paper
crepe paper or felt
pipe cleaners
hot glue gun
*this is an existing template from MarthaStewart.com*
- Cut out the petal shapes (top box of template) from your tissue paper. I folded my tissue in an accordion fashion to cut down on the number of cuts.
- Cut out the single, smaller heart-shaped template from the crepe paper or felt. I cut 2 for each stem, and used green crepe paper. I had it on-hand and found it easy to work with since it stretches around curves easily.
- Bend one end of a pipe cleaner making a soft small center tip on which to build you flower.
- Squeeze a small ring of hot glue slightly below the center tip and begin building the petals, single petals first, adding glue, and then the heart petals as you go.
- Affix the base leaves.
- Fluff petals and shape stems as desired. Voila!

Wednesday, July 28, 2010
Fancy Home Goods

Due to the oppressive summer heat, I've been keeping busy indoors working on home projects. Beautifying your home can be quite rewarding when/if you're in the mood! This quick post is to share a couple of goodies I've made for my mother's home in the past. She found the blank pillow sham above, and I added the monogram. I just love the color combo - so fresh!
I've also personalized several hand towels to adorn her powder rooms. Ooh La La! I'm always amazed at how a simple initial can instantly dress up everyday items. So nice to leave out for guests don't 'cha think?!

Until next time, keep cool!
Sunday, July 25, 2010
Christmas In July
 Santa Claus is coming to town...in exactly 5 months that is! As the Christmas countdown begins, let's use our holiday spirit to cool off a bit shall we?! I'm already skipping down peppermint lane fondly reminiscing about my son's first homemade holiday romper:
Another infamous use of Easy McCall's pattern #2033, minus pockets, and cut to size 1. The fabric is adorable, yet handsome red mini gingham (also used here) lined in the same white goodness used in the 1st romper. Now the super fun stuff - embroidery! I used chocolate brown corduroy to accentuate the Rudolph Applique. And the shoulder button holes are embroidered too - stockings! I can't seem to find them on Embroidery Library anymore...perhaps it's due to some sizing issues. (I had to experiment with several sizes of buttons besides the ones suggested.)


I can hardly believe 2010 will be my 3rd Christmas as a mommie. I'm officially a goober adult that totally gets what all those grown-ups mean when they say "TIME FLIES." ha ha I get a little misty looking back at my sweet baby boy...but it just keeps getting better & better!


Thursday, July 15, 2010
Adjustable Art Smock
 I've been eyeing the waterproof smocks at our local children's museums, and finally got around to making one for my boy. Our easel and play table are daily activity zones, so why not sew something fun to protect all of those mommie-made creations?! Thank goodness for washable markers and crayons tho. Toddler creativity most always goes waaay beyond the seams of a smock!
 I found a great tutorial here that practically mirrors the aprons we use while splashing in the museum water tables. I made my pattern even smaller than suggested, but it still turned out a tad larger than I'd hoped. Oh well - all the more to cover up with!
The fabric is a cotton with laminate overlay - Annette Tatum's Blue Alphabet. It was my first time sewing on this type of (genius!) material, and I found it easiest to stitch on the cotton/wrong side when possible. (more great laminated cotton sewing tips here and here) The adjustable ties are color coordinated blue twill tape. Just zig-zag those ends and you've got yourself a chic no-sew shortcut! I left the ties long to accommodate big boy's growth, and so they could be wrapped around the front and back again. What a tidy and fashionable artiste!

Tuesday, July 13, 2010
Fruit Pie
 It's just not summer without a fresh-from-the-oven fruit pie! I happened upon a simple recipe* for this scrumptious concoction last week, and quickly baked up my very own peach & blueberry version. YUM!
 Ingredients
1 frozen Wholly Wholesome pie crust
sliced fruit & berries of your choice
1 cup half-and-half
1 egg
2/3 cup sugar
1/4 cup flour
1/2 teaspoon cinnamon
1/4 teaspoon salt
sliced fruit & berries of your choice
1 cup half-and-half
1 egg
2/3 cup sugar
1/4 cup flour
1/2 teaspoon cinnamon
1/4 teaspoon salt
Directions: 1. Heat oven to 400 degrees F. Place fruit in pie crust and spread evenly. 2. In a small bowl, combine half-and-half, egg, sugar, flour, cinnamon and salt; whisk until well blended. Pour over fruit. 3. Place pie in oven and bake at 400 degrees F for 50 minutes or until center is set.
The liquid portion ended up being a bit too much for my fruit packed pie, so either put less fruit in or try less half-and-half. Thank goodness I had my pie on a baking sheet that caught some of the excess - whoopsie! Once it's cooled enough to dish, don't forget to plop a scoop of vanilla bean ice cream on top!
*original recipe found in Family Circle's August 2010 issue
*original recipe found in Family Circle's August 2010 issue
Friday, July 9, 2010
The First Romper


Materials & Construction: I used Easy McCall's pattern #2033, minus pockets, and cut to size 1 with generous seam allowances as my son was only 6 months old at his first wear. The striped fabric was in my stash, and the front lining was leftover from the nursery curtains my mother made...have I mentioned this creative thing runs in the family?! The bee embroidery is from Embroidery Library. (it's so sweet that I've also used it here) I omitted the center bloom and inserted a monogram instead:
 One of the biggest challenges was working with snap tape for the first time. It was a big puzzle of sorts, but I'm impressed with how professional it turned out!
 The first romper was great practice and still hangs in his closet...I can't bring myself to pack it up just yet. He wore it from 6 months to 15 months. I'm not quite sure how that feat happened as he is outgrowing clothing at record speeds currently. At least I got good use out of the pattern - check out my other fun rompers here and here!

Subscribe to:
Posts (Atom)