Pages

Showing posts with label applique. Show all posts

Monday, May 27, 2013

Spring Projects

My poor little neglected blog! Now that I have an Iphone, Instagram is my new on-the-go spot to document crafty endeavors. However, here's a peek at what I've whipped up this Spring:


From the top left:
Personalized PBK pillowcase for a preschool friend's birthday
Gym shorts upgrade
Reversible tote bag & personalized bag tag
Bubble shorts
Old Navy dress upgrade
Consignment score upgrade
And the furthest right pics are the front & back views of little sister's Easter dress

If anyone has questions about the embroidery fonts, sewing patterns or materials used, please feel free to comment - I'm happy to share my sources.

Happy almost Summer!

Tuesday, September 25, 2012

Apple of my eye

My, it's been a long time since I posted here! Summer has come and gone, and so have a few projects without documentation. But here's a fun one I'm excited to share!


Recently I mentioned a great pants pattern + tutorial on Facebook. I first used it on a pair of ruffle pants for little sister. (Have you seen what boutiques charge for those? Craziness for something so basic and easy to to make!) Then I happened upon some adorable apple embroidered corduroy fabric on major clearance, so what's a Mommie to do? Whip up another fun pair of pants for the fall closet! Driving home from my unexpected fabric score, I remembered a reverse apple applique sitting in my embroidery files along with a blank shirt in need of decoration. Ah, how I love those meant-to-be moments!

  Shirt - Garanimals, WalMart
Apple Applique - file, Planet Applique & polka dot fabric, Joann
Pants - fabric & rick rack, Hancock

Happy Fall!


Thursday, June 9, 2011

Baby Sister is here!

So the reason for the big pause in posts is baby sister's arrival! She graced us with her presence on her exact due date. Go figure! Big brother's arrival was several days before his due date, so we were thinking a May baby was in the works. But not for our girl - she wanted June!

I'll do my best to post when I can during this new chapter of mommiehood. I'm not sure when I'll be breaking out the sewing and embroidery machines next...sleep is the first priority for a bit! So for now I'll leave you with the shirt I made Big Brother. He is so proud, loving and being such a helpful sibling!

Chachie Font from 8 Claws & a Paw
 Blue & white gingham appliqued letters with matching blue embroidery

Tuesday, May 17, 2011

Nursery Artwork

The clock is ticking and my nesting instincts are raging. If only I could bottle this creative energy - I would love to take a sip during the upcoming newborn sleepless nights we are about to encounter!

In our baby boy nursery, we had a sweet collection of turtle prints:
For baby girl, we decided to keep the same frames, but paint them white. My sweet husband handled the priming and painting, so I was free to create the new art work. Our yard is full of nesting birds, so it seemed perfect to use them in our nest!
This adorable birdie is from Planet Applique.  At first we contemplated using 4 different birds, but in the end we decided to go with 4 of the same, all made out of different coordinating fabrics from my stash. One is even made with a swatch of nursery curtains from big brother's nursery!

The following "after" pictures aren't nearly as bright and crisp as I'd prefer, but I'm up against the clock and wanted to share a peek. I'm really pleased with the results and look forward to introducing our girl to her home any day now!
Even if you don't own an embroidery machine, there are a couple of cute bird templates here and here. Fabric is such a fun canvas!

Monday, April 18, 2011

M-i-c-k-e-y M-o-u-s-e!

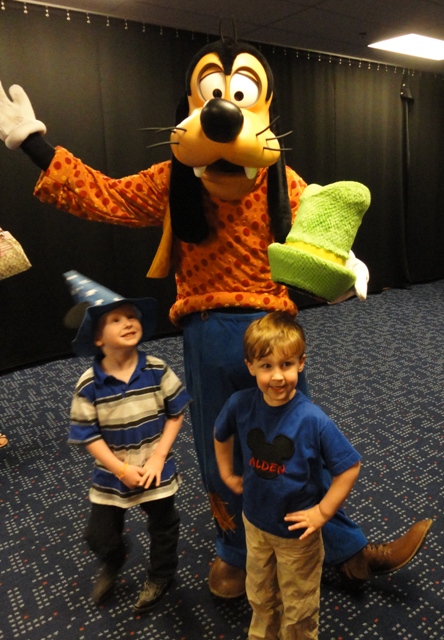
For those that don't know, I have a fondness for all things Disney and Mickey Mouse. I was fortunate enough to work and perform at Walt Disney World during most of my twenties. Needless to say, I can't wait to take big brother and little sister to mommie's ol' stompin' grounds someday soon. But until then, we were lucky enough to meet Mickey this past week here in Charlotte!
Late last year my best friend informed me she would be working in Charlotte this spring with a Disney Live show. I was super excited, not only to spend time with my bestie, but to have the opportunity to share the Disney entertainment world with big boy. With our calendar marked, I browsed the spring consignment sales for blank t-shirts and found this pristine blue one for under $1 - score!
I found the Mickey applique via Etsy and the Disney font here. Both stitched out beautifully! I had the black fabric and thread colors already in my stash, so it was a quick and affordable project. My creative past and present officially melded!

The show was lots of fun, but the best part was meeting the gang afterwards (thanks Jessica!!). Minnie Mouse loved his shirt and made quite a fuss over it. Mommie swooned!

Photobucket
It's hard to put into words how great it was to experience Disney magic again, and as a mother. My performing family is just that - family. I miss them dearly and reminisce of special memories often. It was really rewarding to be on the other side as a guest, and to see my own child enjoy the fun of it all. Here's to many more Disney memories...and of course personalized mommie-made outfits to highlight the experiences!


Tuesday, March 8, 2011

Fire Truck Party: Part One

Calling all firefighters to the station! It's time to share the 3rd birthday celebration!
Photobucket

This year's fire truck theme has been on my mind almost since the close of last year's party. My boy loves a service vehicle, so I knew a home visit by the neighborhood fire crew would be a great way to celebrate. A couple of phone calls had us on their schedule and I was ready to work on invitations!
I worked with Maureen of AndersRuff (another super creative mommie & great friend!) on this adorable personalized invitation. I had the red envelopes in my craft stash from a previous holiday card, created mailing labels with a coordinating font to the invite, and made 2" circular return address labels.

Once the invites hit the mail, it was time to applique the birthday shirt. I found this great design over at Applique Alley. It's especially nice because it can be personalized with a number or initials. 3 is the way to be!

The party favors were also an exciting part of my planning. I'm always cruising Target for clearance bargains, and happened upon these repositionable sticker sets last summer. I wrapped them in solid yellow paper, tied on an organic lollipop with red raffia and included a personalized thank you tag.
Photobucket
And it just so happened that one of big boy's smaller toy bins matched the color scheme and served as a useful container to store the favors. I kept it on our foyer table so we could pass them out as our guests departed.

Stay tuned for Part Two of the party details. I can't wait to show the cupcake display, birthday banner and more of the actual fire truck visit! It was such a fun day!

Resources
Printable Invitation & Thank You Tags - AndersRuff Custom Designs LLC
Envelopes - Paper Source
Gray t-shirt - Garanimals
Applique - Applique Alley
Fireman Sticker Play Set, Raffia, Toy/Favor Storage - Target
Yellow Gift Wrap - Dollar Tree
Yummy Earth Organic Lollipops - Earthfare


Tuesday, February 8, 2011

Baby Shower Gift

It seems like 2011 is a big year for babies, girls especially. Recently I was excited to attend my cousin's baby shower and made a gift set. I ended up not being able to attend since I developed bronchitis...boo!  Luckily I am on the mend and another great granddaughter arrived safely. I can hardly believe my own little bundle will be here in just 3.5 months - wow!

Since the baby's name had yet to be revealed, I went with a little sister applique. I used the trusty petal patch from Applique Cafe and dropped in wording from Monogram Wizard. A sweet bib that I may just have to replicate for our little sister!


I also embellished 2 coordinating burp cloths: one with the same green striped fabric used in the applique, and the other with a green & pink paisley print. The green striped fabric seemed too simple on it's own, so I also added some ric rac and quilting seams to fancy it up a bit more.


Burp cloths are such a fun and easy baby gift to make. Plus they are super functional. Who wouldn't want to have a glammed up burp cloth nearby to wipe away the mess...I mean baby love!


Monday, January 24, 2011

Girly Birthday T's


Big boy and his playmates are turning 3 this year - wow. Weren't we just half asleep, hauling around bucket carriers and talking about starter foods?! Nonetheless, this age of toddler independence is lots of fun and we're ready to welcome another year of bliss. This past weekend we attended a birthday party for our sweet twin friends. The bash was held at the local nature museum and the kiddos had a blast. It's a favorite spot for playdates on cold/hot/rainy days, and this time we got a hands on meeting with a few of the animal residents too!

I'm always keeping an eye out for blank items to embroider, and was lucky enough to score a pair of pink Gap tees on sale last fall. I immediately pegged them for the twins' birthday gifts. I found this layered applique heart over at Planet Applique. If you embroider, go get it - it's a terrific freebie!


Both fabrics are from my stash. They're actually remnants from the shopping cart cover I made...must post on that project soon! I added each girl's initial in the center. If memory serves (preggo brain is somethin' else), I'm pretty sure it's the Techie font from Monogram Wizard. It just so happens to match their backpacks.  The camera flash made the print show thru the solid aqua more so than in person. Perhaps next time I could double up, line or cutaway to avoid any show thru, but I think they looked sweet no matter!


Plans for big boy's 3rd birthday bash are already in motion around here. Hopefully it will work out to be a fun, simple affair. It's so easy to get revved up with all of the cute ideas floating around the internet and blog-o-sphere. Here's to keeping my nesting instinct focused and equally spread out over the many projects in the works!


Thursday, January 20, 2011

Baby Things

Ever since we found out baby #2 is a GIRL!!!, I've had practically nothing but babies on the brain. I still think of my little boy as a baby, but looking at the size of a newborn onesie quickly jolts me into a new reality.  We're slowly starting to work on moving our boy to his big boy room and converting the nursery into girly-land. Lots to do over the next several months, but lots of fun as our family prepares to grow!

Speaking of babies, I made a couple of bib & burp cloth sets for my mother to give as gifts recently. The baby girl has 4 initials, so I wasn't quite sure how to accomodate. Thank goodness for Facebook and Yahoo Group user suggestions!
I went will all 4 initials on the bib, and used the first two only on the burp cloth. The patch is the same one used here but without the additional applique inside. I don't remember the exact fonts I used, but they came from Monogram Wizard. I kept with pink letters and used white mini polka dots on black fabric for the patch. Sweet & simple!

For the baby boy gift, I chose to applique the bib and monogram the burp cloth. I really like this set - so sweet!
The adorable elephant came from Applique Alley and the font is another from good ol' Monogram Wizard. I used a gray print fabric from my stash and kept the theme simple with gray and black thread.


Now I'm off to work on several other gifts...we've got a couple of birthday parties and baby showers to attend. More to come soon!

Saturday, January 15, 2011

Hostess Gift

Our family was invited to a holiday party last month, so here's what I whipped up as a hostess gift. A fun hand towel - you know I have a love for them.


The party hostess is another crafty mommie, so I had a good feeling she (and her little one) would enjoy this gingerbread man. I purchased the applique file a couple of years ago and was excited to put it to good use. Find it here at Embroidery Library.

On a tan blank towel, I used brown corduroy for the body and outlined him in brown thread. Then I used green, red and white threads to create his face and handsome buttons. So simple but sweet!


This post is a tad overdue being that I made & gifted it last month, but still worthy of sharing. It's too cute not to - don't you agree?


Friday, January 7, 2011

Homemade Holiday Apparel

My baby boy is growing up. How can he be turning 3 so soon?! He'll always be my baby, but a tall lovely boy is emerging...one who likes to tell us he's a "big boy" often. For the past 2 years I've sewn him holiday longalls, but this year I knew it was time to move on to "big boy" apparel. I decided to applique a long sleeved shirt and match it to a sweet pair of soft corduroy pants. Ta-da!


I found several Tree-in-a-Truck applique files online, but landed on this one at Planet Applique. It resembles Daddy's truck closest, and little boy is all about equipment these days. The red gingham truck fabric is left over from the very first holiday outfit, the gray pattern bumpers were in my stash, and I picked up the wheel & tree fabrics at Hancock. The tires are black corduroy with a black & white polka dot cotton print in the hubs. The green fur tree was a really fun find. It matched the pants perfectly and little boy loved touching it! I originally wanted a green corduroy tree, but things have a way of creatively working out for the best!


This may be the most complex applique I've stitched to-date. I had to baby-sit it like mad, but had fun making it come together. The fur could have been a disaster, but I tamed the beast and would use it again. I also used Heat 'n Bond Lite for the first time. I've been reading about others swearing by it, and am so glad I tried something new. It really gives the applique an extra smooth and professional finish.


As usual, our holiday season flew by. We visited with Santa (aka Ho Ho Ho) at least 3 times, took a holiday train ride, and even met Frosty & Rudolph. I guess this shirt is now set to hang with other special garments of holidays past. Sigh. Perhaps one day I will make a quilt or other keepsake with all of his mommie-made things...or hold on to them for his children to wear. My mother has a cedar chest full of homemade lovelies just waiting for the next generation. What a southern & grand tradition - I love passing it on!

Sunday, October 31, 2010

Happy Halloween!


Wow - how is the big day already here?! Unfortunately the second half of October has been a project-free zone due to a nasty virus circulating thru our abode. BOOooooo! Thankfully we all seem to be on the mend, and are looking forward to a fun evening of trick-or-treating. Little boy will be carrying his appliqued treat bag, mommie will be beaming with pride and daddy will be trying to stuff the bag full! Be safe and here's to many treats!


Thursday, October 7, 2010

Holiday Hand Towel

An adorable Halloween applique has been sitting on the back burner, so I grabbed a blank kitchen towel from my stash this week and got to stitching. I'm a sucker for a cute holiday hand towel. What do you think?!


The patch is from a new favorite source, Applique Cafe.  I found the polka dot fabric at Hancock, and the white came from my stash - scraps from lining rompers...that my boy is now too tall to wear...sigh. 


I'm excited to adorn my kitchen with some Halloween cheer. Luckily my "big" boy is beginning to enjoy the decor of the season as well, so here's to filling our house with more mommie made boo-tiful love!

Sunday, October 3, 2010

Girly Patch

Remember that blank white tee on my to-do list?  Well, here's the finished product!

 
I instantly fell in love with this patch over at Applique Cafe. It's so sweet and simple. Options galore!


 I'll be adding tshirts to my etsy shop super soon. Time to get stitchin'!

Tuesday, September 14, 2010

Sweet Snowman

Summer is lingering way too long around these parts if you ask me!  Luckily we are waking up to cooler mornings, but by lunch, the taste of fall is gone and summer makes an ugly return.  I'm ready for fall leaves instead of dead crispy ones falling when the hot dry wind blows.  So in an effort to keep (my) cool, I whipped up this little winter number for my boy:


I've been trying a different applique process other my norm, and officially decided after this stitch-out that I will return to my usual.  Normally I stitch the applique outline on paper and cut out the fabric piece(s) by paper pattern(s).  An alternate method is to stitch down small squares of fabric and then cut them closely to the stay seam with applique scissors before the final edging.  I've definitely decided that I like prepping everything ahead of time, and then just going for it.  It's less annoying to me and provides a tidier finish in my opinion.  You never know until you try! (please pardon the shop talk non-applique-rs!)


The snowman face turned out a little more shabby chic than polished to me.  And I think in his case, it works!  I found him over at Planet Applique.  Join their mailing list for monthly freebies that are super cute like this one.  I can hardly wait for temperatures to drop enough to wear long sleeves again.  Here's to a cool down - FAST ...and a little snow this winter wouldn't hurt one bit!

Wednesday, September 8, 2010

Trick-or-Treat Bag

 
Hello jack-o-lantern!

I had to remove the bag's side seam to accomodate my large embroidery hoop, so while the stitching's out I'm going to applique something fun to the back too!  My son already loves his goodie bag and is practicing trick-or-treating around the house.  Big smiles for this mommie!  Final project pics to come.

ps - I found the cutie face over at Applique Cafe.  So many adorable designs, so little time...sigh.  Thank goodness preschool is back in session!

Wednesday, September 1, 2010

Sneak Peek: Treat Bag


I'm sooo excited to complete this project!  It's been on my to-do list since last Halloween!  I found the black & white gingham fabric over the weekend and purchased an applique file last night.  Everything's washed, pressed and ready to go.  Can you guess what will appear on the bag?  Stay tuned!


Sunday, July 25, 2010

Christmas In July

Santa Claus is coming to town...in exactly 5 months that is! As the Christmas countdown begins, let's use our holiday spirit to cool off a bit shall we?! I'm already skipping down peppermint lane fondly reminiscing about my son's first homemade holiday romper:


Another infamous use of Easy McCall's pattern #2033, minus pockets, and cut to size 1. The fabric is adorable, yet handsome red mini gingham (also used here) lined in the same white goodness used in the 1st romper. Now the super fun stuff - embroidery! I used chocolate brown corduroy to accentuate the Rudolph Applique. And the shoulder button holes are embroidered too - stockings! I can't seem to find them on Embroidery Library anymore...perhaps it's due to some sizing issues. (I had to experiment with several sizes of buttons besides the ones suggested.)


I can hardly believe 2010 will be my 3rd Christmas as a mommie. I'm officially a goober adult that totally gets what all those grown-ups mean when they say "TIME FLIES." ha ha I get a little misty looking back at my sweet baby boy...but it just keeps getting better & better!

LinkWithin

Related Posts with Thumbnails