Pages

Showing posts with label decor. Show all posts

Tuesday, May 17, 2011

Nursery Artwork

The clock is ticking and my nesting instincts are raging. If only I could bottle this creative energy - I would love to take a sip during the upcoming newborn sleepless nights we are about to encounter!

In our baby boy nursery, we had a sweet collection of turtle prints:
For baby girl, we decided to keep the same frames, but paint them white. My sweet husband handled the priming and painting, so I was free to create the new art work. Our yard is full of nesting birds, so it seemed perfect to use them in our nest!
This adorable birdie is from Planet Applique.  At first we contemplated using 4 different birds, but in the end we decided to go with 4 of the same, all made out of different coordinating fabrics from my stash. One is even made with a swatch of nursery curtains from big brother's nursery!

The following "after" pictures aren't nearly as bright and crisp as I'd prefer, but I'm up against the clock and wanted to share a peek. I'm really pleased with the results and look forward to introducing our girl to her home any day now!
Even if you don't own an embroidery machine, there are a couple of cute bird templates here and here. Fabric is such a fun canvas!

Tuesday, May 10, 2011

My DIY Nursery Curtains

In case you happened to miss my decorating train of thought for baby girl's room, you can get caught up here.
Now for a quick look back at what was hanging before in the baby boy nursery:
These were mommie made by my mommie, also known affectionately as "Mi" by big brother. It was bittersweet taking them down, but I've tucked them away, and hope to put the material to good sentimental use someday.

I'm a girl that likes to have a pattern to start with, so I did some online research to see if anything existed along the lines of my vision. The closest pattern I found was view A of McCalls 6093. It's a box valance meant to be board mounted, but the paper pattern was perfect for my fabric and lining. All I needed to add was a rod pocket - easy!
I can't help but giggle at the "Home Dec in a Sec" tagline they use on the envelope. Is DIY home decor truly possible in one second?! Not at my house.

After selecting and preparing my fabric, I measured both rod sections over the connecting windows to determine my custom panel widths. Turns out they were not exactly equal...gotta love older homes! Each panel was cut on a fold, so I made sure to carefully line up my stripes which is always a bit daunting. Luckily the pattern repeats easily, and the lining is solid. Next I lined up the pattern fold line at the appropriate half-width (including seam allowances) and got to pinning. To create the a-line on each side of the treatment, I used a fabric marker to draw a slant edge from pattern top to bottom, shown here:
I first extended the bottom cut line
and connected to the top cut line with a straight edge.

I always feel so accomplished once a project is cut out, don't you? Most of the logistics are finally figured out, and it seems at least half, if not more, of the battle is over. Finally time to get sewing!

Right before my first stitch, I draped the cut striped panels over the rods to determine matched placement of the inner middle seams. Even though I cut both panels with a-lines on each side (due to the fold), I wanted them to look continuous despite the small middle rod brace. Hopefully I'm making sense here! I marked each panel at a desired stripe near the brace, placed right sides together with my lining, and followed the mark sewing up a straight seam. Then I figured out exactly how much of a seam allowance I needed to carefully take on the a-line side. The goal was for the panel to hang perfectly flat across the rod. After ensuring I had sewn both side seams correctly, I cut the inner straight seam's a-line excess off. Unturned edges shown below:
I hemmed each panel thereafter, turned them right side out and pressed. Almost done!

Lastly I needed to create the rod pocket. I folded the open top down 1/4", pressed, and then folded and pressed down another 2". I sewed a straight seam across the lower pressed edge. Done! Time for their debut!

I'm really pleased with the results of the these simple, classic curtains. They even inspired me to deep clean the blinds, windows, trim and sills. If only I could bottle this nesting energy! I hope my how-to ramblings made sense - thanks for following along or at least trying to!


Tuesday, May 3, 2011

Making Over The Nursery

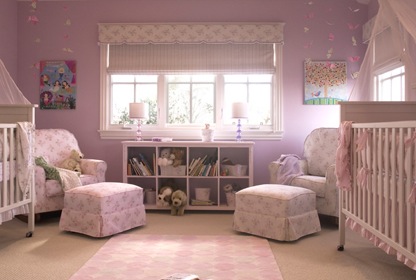
As soon as we found out baby #2 is a girl, I immediately started looking around for nursery inspiration. Luckily we already have big brother's essentials...crib, dresser / changing table, and glider. All are white to match the room's trim, and the walls are a neutral tan. Gotta love the practical (yet stylish!) minds of crafty, frugal parents!

My first find for the updated room was crib bedding. I landed an amazing Dwell Studio boutique set (now discontinued) from Craigslist of all places! I was immediately drawn to the modern and fresh alternating patterns:
 
 Next I began to think about curtains. With the bedding so strong on print, I wanted to keep the window treatment style clean and simple. Below are two of my favorite inspiration photos. Both showcase basic toppers that are classic and feminine: 
via Cheap & Chic Nursery and Me and Wee
via Celebrity Babies

Then it was time to find a fabric that would tie in the bedding with our glider cushions and various other accesories. Light green was a main color in baby boy's nursery, so my mother and I selected this print at Mary Jos to tie the new room together:
Down the Road by Waverly

I've been working on the curtains in stages over the past couple of months, so I'm excited to finally reveal baby sister's mommie made creations. A simple a-line look - LOVE!
Freshly pressed and hung today!
I'm tickled pink with the results (couldn't help myself with that one!), and look forward to sharing the curtain how-to soon. Stay tuned for more on the nursery transformation as this mommie bird nests away!

Wednesday, March 16, 2011

Fire Truck Party: Part Two


I revealed the invites and several key themed accessories in Part One . Now on to the actual event! It was so much fun (& easy!) to plan, plus it didn't cost a fortune. Birthday party success!


I used the birthday boy's Ikea easel to welcome our guests. Yellow chalk and a couple of printable party logos instantly set the theme. (more on the logos below) Aren't the polka dot balloons fun too?!

I pondered how I was going to create this year's birthday banner...I wanted something simple but all of my ideas were complicated. Thankfully a trip to Dollar Tree saved the day! I found this red and black banner, and the only flaw it had were monster truck icons on each end and the center - ha! I simply had Maureen of AndersRuff create a firetruck and "3rd" circle printable logo to transform my bargain banner. Themed perfection!

Now on to the cupcakes...mmmnnnnn! In the past I've created a themed cake, but again, I wanted to keep things simple this year. Cupcakes are so easy and fun for all ages. There are SO many adorable decorating ideas floating around, so I decided to jump on board the toppers craze. My pal Maureen of AndersRuff created the cutest printable toppers. I had so much fun punching, cutting and assembling - you can't beat no mess decorating!
Photobucket
Photobucket
Our dining room buffet was the perfect display for the cupcakes. I used red and white polka dot fabric to highlight the scene. Big thanks to my mom for supplying the cake stands and white trays. And I couldn't resist using a favorite fire truck, firefighter and accessories to round out the table!
Photobucket
I'd love to say the cupcakes were made from scratch, but alas they are from cake mix. However, it's seriously the best cake in my opinion! Dr. Oetker makes the yummiest organic flavors and are my go-to for special occasions. I used Jacinda's Decorator Icing recipe from Prudent Baby and piped it on in sweet swirls. (I used the butter + vegetable shortening minus transfat + meringue powder version, and it was ah-mazing!) They were absolutely delicious and happily consumed by all...especially by this pregnant mommie!
Photobucket
Party day was super, including the weather. The firetruck and it's crew were prompt, gentle with the kids and achieved near rock star status. After the cupcakes, ice cream cups and "fire extinguishers" (aka juice boxes) were consumed, everyone kept busy with indoor toys or the backyard playset. We are so lucky to have such great friends and family - kids and adults alike!

After the birthday blitz settled, it was time for thank you notes. (Proper Southerner here!) I re-printed the backside of the party invite to use as a notecard and used the same envelopes and labels as before.

Thanks again to all who celebrated the big day with us, and thanks to you for taking the time to check it out!

Resources
Party Printables including Invites, Toppers & Logos - AndersRuff Custom Designs
Printing - Office Depot and my home HP PhotoSmart
Polka Dot fabric & balloons - Hobby Lobby
Basic Banner, Yellow Napkins - Dollar Tree
Cupcake Liners & Topper Sticks - Michaels
Dr. Oetker Vanilla Cake Mix - Earthfare
Red Plates - Target
White Napkins - Ikea
Vanilla & Chocolate individual Ice Cream Cups - WalMart
Photography - Maureen Anders & yours truly ;)

and 


Saturday, January 15, 2011

Hostess Gift

Our family was invited to a holiday party last month, so here's what I whipped up as a hostess gift. A fun hand towel - you know I have a love for them.


The party hostess is another crafty mommie, so I had a good feeling she (and her little one) would enjoy this gingerbread man. I purchased the applique file a couple of years ago and was excited to put it to good use. Find it here at Embroidery Library.

On a tan blank towel, I used brown corduroy for the body and outlined him in brown thread. Then I used green, red and white threads to create his face and handsome buttons. So simple but sweet!


This post is a tad overdue being that I made & gifted it last month, but still worthy of sharing. It's too cute not to - don't you agree?


Wednesday, December 8, 2010

Deck the Halls


My favorite time of year to skim magazines is October thru December. I love finding new recipes to try and refreshing takes on holiday decor. I personally tend to stick to traditional styles, but by keeping my mind and eyes open, I usually find new twists that refresh my annual decor.  This year I was drawn to several wreaths featured in Better Homes and Gardens.


Offset placement of simple accents spoke to me, so I headed to the craft store in search of decorative stems to update our usually WAY basic front door wreath. My favorite photo inspiration is inside the BHG mag (page 120 for you subscribers out there). The spray of winterberry looks so classic yet modern, and reminded me of my December wedding. Maybe one day I'll splurge for a fresh wreath, but for now I'm quite pleased with the updated look on our front door! And it cost me less than $4 - affordable stylish crafts are always a holiday treat!

LinkWithin

Related Posts with Thumbnails