Pages

Thursday, October 3, 2013

Handmade Halloween 2013, Part 1

I've always loved dressing up for Halloween; the theatrics of it all is so appealing! I believe it all started in 2nd Grade when my Mom made me my very own Annie dress. I felt so special and the dress was spot-on - I even had the wig, locket and Sandy plush! In my twenties, my love of dance paid off and I became a Walt Disney World Entertainment Cast Member. Not only did I dress up for a living then, I enjoyed coming up with fun Halloween costumes..all stemmed from the creativity (and resources!) I was lucky enough to work around. Now that I'm a mother, I'm just as excited to celebrate the holiday by helping my children make their costume wishes special. Big brother announced quite a while ago his choice - a Knight. We scored a shield and sword set at a local yard sale this summer, so a mommie-made tunic is in order to complete his look - easy and fun! What I didn't expect was Little Sister's strong opinion on her look...Princess Sofia! Or 'Fia as she's affectionately called by my girl!
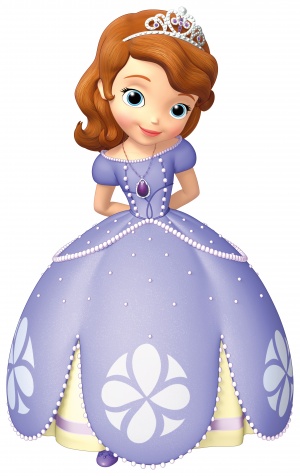
  
I started out pricing a few pre-mades around town, but I just couldn't bring myself to shell out $20+ for a flimsy, asking-to-be-snagged dress. The request for a 'Fia dress has only grown stronger, so I knew it was time to make my girl her first princess ensemble. Thanks to Pinterest and awesomely generous sewing blogger tutorials, I made a plan and gathered my supplies. 

Princess Sofia's skirt holds the most detail, so I decided to put my focus there. It's basically a layered skirt, and Dana of MADE has a fantastic tutorial that walked me through. (She seriously has the BEST DIYs if you are ever looking for easy starter projects with professional results!) I started by assembling my two main layers, white and purple, and then figuring out the scallops. Our Ikea dinner plates were perfect!


Next up was the design within each scallop. I was thrilled to find a stencil from Melly Sews! I couldn't have had a better first experience with freezer paper stencils - so cute, easy and perfect.


Next I added white pom pom trim to the scalloped edges. I used a zigzag stitch allowing me to sew on top off the curved edges - major time saver! I also added a band of purple & white polka dot grosgrain ribbon to the white underskirt. It was a bit slippery to sew, so I attached it with Heat 'n Bond first making top stitching much easier!

Now it was time to figure out the bustle / peplum portion of the skirt. I played around with a few ideas trying to keep the third layer as simple as possible. I went with a version of Handmade Toast's hip poof's, cutting half circles in my sheer dotted fabric and serging their curved edge. I sewed the bustles to the purple layer, and then created the waistband casing between the purple layer and the white. Sounds confusing, right? It totally wasn't  - check out the first comment under the skirt tutorial. High fives for all of the helpful seamstresses out there!

Little Sister was so excited to see the 'Fia skirt today after preschool! She wouldn't hold still long enough for me to finalize the elastic sizing, so here's hoping we can get it done tomorrow. I also found the perfect shirt and a simple crown to complete the set. All that's left is an amulet and she'll be the cutest 'Fia in the land!

I'm thrilled to continue sewing labors of love for my children. Time to start work on my handsome Knight and get ready for a month of costume (and candy) fun!


Wednesday, June 26, 2013

Ruffled Shorts

Summer's here so inspiration struck to complete a project from the craft pile - a pair of shorts for little sister. She needed something to pair with an adorable top I thrifted earlier this year. Have I mentioned my love of consignment and thrift shopping?! Shopping in general is pretty awesome, but finding gently used treasure is the best! With two (impatient) children, I don't get to it as much as I'd prefer, but that's probably a blessing to the wallet and (full) closets. 

The Bailey Boys criss-cross top, vintage & thrifted
with Mommie-made ruffle shorts

Sometime this winter I cut out green polka-dot fabric intending to make my girl ruffle pants. I never got around to actually sewing them, so I decided to chop off the pant legs and sew up some sweet summer shorts! I just love the mix of gingham and polka dots! And in the spirit of mixing, I fused two patterns - Flat Front Pants from MADE and Ruffled Boxers from The Sewing Rabbit. My inspiration turned into a super easy pair of girly shorts that came together fast!


 I love how the ruffles curve up on the sides - a fun twist to a standard ruffle on a straight hem. They would be especially cute and comfy in knit, so I really need to get serious about some knit sewing practice! 

Happy Summer everyone!


Monday, May 27, 2013

Spring Projects

My poor little neglected blog! Now that I have an Iphone, Instagram is my new on-the-go spot to document crafty endeavors. However, here's a peek at what I've whipped up this Spring:


From the top left:
Personalized PBK pillowcase for a preschool friend's birthday
Gym shorts upgrade
Reversible tote bag & personalized bag tag
Bubble shorts
Old Navy dress upgrade
Consignment score upgrade
And the furthest right pics are the front & back views of little sister's Easter dress

If anyone has questions about the embroidery fonts, sewing patterns or materials used, please feel free to comment - I'm happy to share my sources.

Happy almost Summer!

Tuesday, September 25, 2012

Apple of my eye

My, it's been a long time since I posted here! Summer has come and gone, and so have a few projects without documentation. But here's a fun one I'm excited to share!


Recently I mentioned a great pants pattern + tutorial on Facebook. I first used it on a pair of ruffle pants for little sister. (Have you seen what boutiques charge for those? Craziness for something so basic and easy to to make!) Then I happened upon some adorable apple embroidered corduroy fabric on major clearance, so what's a Mommie to do? Whip up another fun pair of pants for the fall closet! Driving home from my unexpected fabric score, I remembered a reverse apple applique sitting in my embroidery files along with a blank shirt in need of decoration. Ah, how I love those meant-to-be moments!

  Shirt - Garanimals, WalMart
Apple Applique - file, Planet Applique & polka dot fabric, Joann
Pants - fabric & rick rack, Hancock

Happy Fall!


Friday, May 25, 2012

Spidey (Serger) Power

Big Brother is into all things Spider-Man at the moment. We are constantly being shot by webs and the Spidey jammies are in heavy rotation. He even found a Spider-Man & Friends board book at a spring consignment sale...talk about combining mommie and daddie's interests: a bargain hunter who likes to read comics!!

Need I say more?!

After we recently spotted the Spider-Man goodness at Pottery Barn Kids, I offered to make Big Brother a special pillowcase. So off we went to the fabric store where he chose two prints of Spidey fabric. 
It turned out to be the perfect starter project for my new serger! In total, it took a yard of fabric and only 4 quick seams thanks to this tutorial.

Now off to further explore the serger - the possibilities make me as giddy as a 4 year old with a new mommie made pillowcase!
Sweet dreams big boy, I love you so much!


Monday, May 21, 2012

M & M Teacher Gift

Today big brother completed his third year of preschool. I think we are both sad to see the routine go, but equally excited to make special summer memories. At the end-of-year picnic, big brother presented each teacher with this special treat to let them know how much he enjoyed their class:


 I came across this adorable jar gift idea on Pinterest awhile back and knew it would be perfect for the end of school. To save time, I used a free printable and tied it on with baker's twine. I plan to re-create this sweet gift in years to come, and may make my own printable version of the poem in card format.

Thank You Teachers & Happy Summer Break!


Wednesday, May 16, 2012

Another Polo

I had a small window of time this morning for some sewing, and finally got to work on more polo shirts from the to-do pile. Isn't the little whale cute?! He swam over from Applique Momma. This shirt belongs to a set of matching sibling polos for my sweet friend Maureen. I hope her boys enjoy them this summer!


I've got a few more projects to finish up, and then I'm excited to dive into practice with my new SERGER!! I'm still in shock that I finally have one of my own. This year's birthday and Mother's Day were good to this Mommie!

Saturday, March 17, 2012

Personalized Polo

Several of my favorite embroidery digitizers have introduced mini filled designs. I've been eager to try them out for big brother, and finally found some time. Polo shirts are a staple in his wardrobe; here's the most recent addition to his collection!


I used the Filled Sailboat Mini from Embroidery Boutique. The color combo matches one of baby sister's dresses. Let the photo ops begin!

I'm always keeping a look out for bargain blank polos, and have several more ready for boutique status. Minis are so fun and super quick to stitch. This could get addictive! 


Wednesday, January 4, 2012

Fast & Easy Delicious Soup

Welcome 2012! This time last year I was pregnant with baby number 2, who is now 7 month old baby sister. Wow. Time is going much too fast, but I'm doing my best to enjoy every minute of it. I look forward to future days that hold some extra time & energy so I can get back to sharing more crafts and projects. Until then, thanks to those who are still up for peeking at my little part of the mommie made blog world!

Recently I happened upon a delicious soup recipe that I have to share. It's a one pot wonder that is so tasty, so good & super easy to prepare. Here's my vegetarian version:

 Tomato Soup with White Beans & Pasta
via AllYou January 2011
2 tablespoons olive oil
2 cloves garlic, finely chopped (I squeeze 'em thru our press)
1/4 tsp dried oregano
2 14.5oz cans diced tomatoes
28oz veggie broth
1/2 cup small pasta (I use elbows)
1 can cannellini beans, drained & rinsed
salt, pepper & any other seasoning you enjoy

 Start by warming the oil in your pot over medium-high heat. (I like using my dutch oven.) Add the garlic, stirring frequently and cook until fragrant, about 1 minute. Stir in oregano, then tomatoes & broth. Bring the soup base to a boil. Next add the pasta, stir occasionally and cook about 8 minutes. Add the beans, stir and lower to a simmer for about 5 minutes. Season with salt & pepper, and I like to add some of Trader Joe's 21 Seasoning Salute too. Keep it warming on the stove top for a bit or go ahead & ladle into bowls alongside some warm crusty garlic bread. YUM!

Most recipes I find in magazines typically turn out bland, so I was shocked that this turned out so well! I found it in All You, which I began subscribing to a few months back for the coupons. (I'm not a candidate for Extreme Couponers, but do enjoy saving our household serious cash!) What a pleasant surprise and an excellent addition to our dinner rotation during cold winter nights. I hope you give it a try and like it as much as we do!


Sunday, November 20, 2011

Pine Cone Bird Feeders

On an October afternoon walk around the neighborhood, big brother and I spotted some lovely pine cones. I instantly knew we should grab a few for a fun project - bird feeders! So into baby sister's stroller basket they went.

A few days later we just happened to be stuck indoors due to rain. I found some spare ribbon in my craft stash and tied loops to the tops of our pine cone treasures. Then I newspapered the dining room table and filled a shallow bowl with bird food. After grabbing the jar of peanut butter for the shot above, I decided to spoon out a glob of it into a separate dish to avoid double dipping the spatula back in the jar. (Good thinking mommie!) Once the sticky layer was complete, it was time for big brother to cover the cones in bird seed.
Once he got over the initial prickles of the pine cones, he had tons of fun smashing lots of seeds into the peanut butter. He was so tickled and excited to make these for the birds that frequent our yard.
Once our feeders were complete, I stored them in a resealable bag. A few days later once the sun returned, we headed out to hang our creations and spy on our birdie friends.
Photobucket
We watched our pine code feeders often, but I wasn't able to capture an action shot. Oh well, such is the life of this busy mommie bird! We have proof that our efforts were enjoyed tho - the backyard feeder was knocked down and devoured by pesky squirrels, and the front one is still hanging just as bare as the now leafless tree!

 Since this easy project was such a hit, I plan to do it again and again. If we don't have the good fortune of accessible pine cones, there are tons of ideas online (pinterest anyone?!), including stacked cheerios on pipe cleaner stems or this adorable inverted sugar cone - genius!
via www.BettyCrocker.com

Monday, October 10, 2011

Taggie Blanket

 Here's a little something I recently whipped up for baby sister - a mommie made taggie blanket!


I found the pre-quilted fabric at Hancock, which matched up to the coordinating gingham already in my stash. The tags are trims and ribbons in a mix of new and stash also. I found a nice reference here and it came together SO quickly!

This spur-of-the-moment project was immediately put to good use. I love that she loves it! 

I'm starting to find creative moments again, but lack the additional time (and sometime motivation) to post all about the fun. I'll share and catch up the best I can tho! Thanks for taking the time to check out my space and Happy Fall to all!

Friday, August 26, 2011

Baby's First Embroidery

Summer may be coming to a close, but my crafty endeavors are just beginning for baby sister. I finally found some extra time to whip up a personalized burp cloth. I mentioned before on my Facebook page, I've got them all over the house, just never in the exact spot I end up needing one. So here's another to add to the laundry load!


I started by sewing polka dot grosgrain ribbon to the bottom hem of a Gerber organic diaper cloth. After browsing all of my Monogram Wizard Plus fonts, I decided to use 3 different fonts to spell her name...yes, I'm a nut, lean towards obsessive compulsive, and always seem to make things harder than need be. But isn't that why we crafters create? - to make exactly what we want and uniquely so to boot!
- E is Exact, LL is Fletch and A is Curly Q -

Big brother's first embroidery was the same (but with his name in a more masculine font of course), so now I have a pair of baby keepsakes. Good thing they are absorbent because I am sure they will wipe my tears when I fondly reminisce of baby days.

For now we are enjoying our precious chubby bundle's sweet smiles and coos. She's pictured above on a blanket made by her great-grandmother, and is wearing her mommie's very own vintage bubble suit!

Tuesday, August 9, 2011

Summer Reads

Hello there! Our summer continues to be filled with caring for my two most precious creations - big brother and baby sister. However, I've got a few small projects waiting for me on the dining room table along with my sewing machine. I'm ready to get back to it!

Today we braved the heat (which doesn't happen often unless necessary...hello fall? we're ready!) and made our way out to pick up some library books. I often come across blog posts that share favorite reads of preschoolers. I check the story lines out online, add them to our hold request list if they look appealing and hope we'll find exciting new stories. We've tried LOTS, and sadly most don't hold big brother's (or my) attention. However, today we hit the jackpot so I thought I'd share. 

Our local nature museum has the sweetest, cutest pair of owls. We've visited the mommy and baby owl more times than I can count, so I had high hopes this book would be a hit and it is!

This one was spotted first on our holds stack and met with "Mommie look - bunnies!" Adorable animals are an instant attraction at our house!

Both books have well told, sweet stories. The illustrations are beautiful, and really hold my 3 year old's attention. We read them as soon as we got home, and Daddy was requested to read them again at bedtime. Ahhh, sweet summer reading satisfaction with worthiness of future purchases!


Tuesday, July 5, 2011

Girly Burp Cloths


I whipped up these two fancy burp cloths a few weeks pre-baby. One for us and one for a friend who welcomed a baby girl just 2 weeks after baby sister's arrival. The floral fabric is a Circo (Target) soft flannel blanket that I thrifted. I loved the colors, it was brand new and a total fabric bargain at only 75 cents! The coordinating rick rack just happened to be in my stash left over from big brother's nursery curtains

Due to my nesting frenzy, I didn't think to take pictures of the (very few and basic) steps involved. So here's a text style tutorial. I promise they are super easy to make!

 1. Prewash + dry your fabric and plain burp cloths
2. Measure the middle, thick panel of the burp cloth. They're often uneven, so be your own judge and make the best rectangle you can.
3. Add a quarter to a half inch to the rectangular measurement for a seam allowance and cut fabric accordingly
4. Fold and iron under the seam allowance of cut fabric panel
5. Measure and cut desired lengths of rick rack
6. Place fabric panel over rick rack, turning under rick rack ends and pin in place over the burp cloth mid panel
7. Sew around the panel. Quick tip: I usually keep white thread in my bobbin and use a matching color on top. 
8. You're done - burp away baby!

And just for kicks, here's a few more I've made along the way:
personalized embroidered burp cloths
more fabric burp cloths

We're still without a schedule around here, but I've got a few embroidery projects lined up for baby sister. I'll share once they're complete!

Saturday, June 18, 2011

Another Birthday Beach Towel

My go-to gift this late spring / summer for kiddos has become a personalized beach towel. In case you missed the others, check 'em out here. I love the color combo of this handsome towel for Garrett, our neighborhood buddy who just joined the big brother club this week. Baby sisters are popping up everywhere!

Curvy Font in Monogram Wizard Plus

I hope everyone is keeping cool and enjoying summer!

Thursday, June 9, 2011

Baby Sister is here!

So the reason for the big pause in posts is baby sister's arrival! She graced us with her presence on her exact due date. Go figure! Big brother's arrival was several days before his due date, so we were thinking a May baby was in the works. But not for our girl - she wanted June!

I'll do my best to post when I can during this new chapter of mommiehood. I'm not sure when I'll be breaking out the sewing and embroidery machines next...sleep is the first priority for a bit! So for now I'll leave you with the shirt I made Big Brother. He is so proud, loving and being such a helpful sibling!

Chachie Font from 8 Claws & a Paw
 Blue & white gingham appliqued letters with matching blue embroidery

Friday, May 27, 2011

Choo Choo BBQ

We are anxiously awaiting the birth of baby sister. Big brother arrived several days before his due date, but it seems our girl is snuggled up and has her own agenda. So as we kick off a Memorial Day weekend of waiting, I thought I'd share one of my husband's favorite go-to crock pot recipes. It's on right now for dinner, planned to go alongside some ears of fresh corn. (And for those that don't know, I'm a vegetarian, but the ease of preparation allows me to put this on for the hubs and move on to my own version of chicken!)

My brother is responsible for sharing the super simple recipe, found here. Thanks Esteban! We make a half batch most times which still yields plenty. And a great tip of my bro's is to use half of the BBQ sauce initially, shred the meat about 30 minutes before time to eat, then add it back to the crock with the remaining sauce.


 I served this dish as Choo Choo BBQ for big brother's 2nd birthday party and it was a hit in the Dining Car...get it?! We also offered Chugga Chugga Punch. This mommie loves a good theme! For more on the Train Party, head here and here.
 
Happy holiday weekend everyone! Hopefully I'll have baby news to share soon...or lots more nesting projects!


Friday, May 20, 2011

Birthday Beach Towels

We celebrated a couple of birthdays this week, so here's a peek at our friends' personalized beach towel gifts!

A mermaid towel for Julia:
Photobucket
Easy Font in Monogram Wizard Plus

And a handsome striped towel for James:
High Pockets Font in Monogram Wizard Plus

Now to ponder when our May baby will arrive...could be any day now! :)


Tuesday, May 17, 2011

Nursery Artwork

The clock is ticking and my nesting instincts are raging. If only I could bottle this creative energy - I would love to take a sip during the upcoming newborn sleepless nights we are about to encounter!

In our baby boy nursery, we had a sweet collection of turtle prints:
For baby girl, we decided to keep the same frames, but paint them white. My sweet husband handled the priming and painting, so I was free to create the new art work. Our yard is full of nesting birds, so it seemed perfect to use them in our nest!
This adorable birdie is from Planet Applique.  At first we contemplated using 4 different birds, but in the end we decided to go with 4 of the same, all made out of different coordinating fabrics from my stash. One is even made with a swatch of nursery curtains from big brother's nursery!

The following "after" pictures aren't nearly as bright and crisp as I'd prefer, but I'm up against the clock and wanted to share a peek. I'm really pleased with the results and look forward to introducing our girl to her home any day now!
Even if you don't own an embroidery machine, there are a couple of cute bird templates here and here. Fabric is such a fun canvas!

Tuesday, May 10, 2011

My DIY Nursery Curtains

In case you happened to miss my decorating train of thought for baby girl's room, you can get caught up here.
Now for a quick look back at what was hanging before in the baby boy nursery:
These were mommie made by my mommie, also known affectionately as "Mi" by big brother. It was bittersweet taking them down, but I've tucked them away, and hope to put the material to good sentimental use someday.

I'm a girl that likes to have a pattern to start with, so I did some online research to see if anything existed along the lines of my vision. The closest pattern I found was view A of McCalls 6093. It's a box valance meant to be board mounted, but the paper pattern was perfect for my fabric and lining. All I needed to add was a rod pocket - easy!
I can't help but giggle at the "Home Dec in a Sec" tagline they use on the envelope. Is DIY home decor truly possible in one second?! Not at my house.

After selecting and preparing my fabric, I measured both rod sections over the connecting windows to determine my custom panel widths. Turns out they were not exactly equal...gotta love older homes! Each panel was cut on a fold, so I made sure to carefully line up my stripes which is always a bit daunting. Luckily the pattern repeats easily, and the lining is solid. Next I lined up the pattern fold line at the appropriate half-width (including seam allowances) and got to pinning. To create the a-line on each side of the treatment, I used a fabric marker to draw a slant edge from pattern top to bottom, shown here:
I first extended the bottom cut line
and connected to the top cut line with a straight edge.

I always feel so accomplished once a project is cut out, don't you? Most of the logistics are finally figured out, and it seems at least half, if not more, of the battle is over. Finally time to get sewing!

Right before my first stitch, I draped the cut striped panels over the rods to determine matched placement of the inner middle seams. Even though I cut both panels with a-lines on each side (due to the fold), I wanted them to look continuous despite the small middle rod brace. Hopefully I'm making sense here! I marked each panel at a desired stripe near the brace, placed right sides together with my lining, and followed the mark sewing up a straight seam. Then I figured out exactly how much of a seam allowance I needed to carefully take on the a-line side. The goal was for the panel to hang perfectly flat across the rod. After ensuring I had sewn both side seams correctly, I cut the inner straight seam's a-line excess off. Unturned edges shown below:
I hemmed each panel thereafter, turned them right side out and pressed. Almost done!

Lastly I needed to create the rod pocket. I folded the open top down 1/4", pressed, and then folded and pressed down another 2". I sewed a straight seam across the lower pressed edge. Done! Time for their debut!

I'm really pleased with the results of the these simple, classic curtains. They even inspired me to deep clean the blinds, windows, trim and sills. If only I could bottle this nesting energy! I hope my how-to ramblings made sense - thanks for following along or at least trying to!


LinkWithin

Related Posts with Thumbnails