Pages

Friday, May 27, 2011

Choo Choo BBQ

We are anxiously awaiting the birth of baby sister. Big brother arrived several days before his due date, but it seems our girl is snuggled up and has her own agenda. So as we kick off a Memorial Day weekend of waiting, I thought I'd share one of my husband's favorite go-to crock pot recipes. It's on right now for dinner, planned to go alongside some ears of fresh corn. (And for those that don't know, I'm a vegetarian, but the ease of preparation allows me to put this on for the hubs and move on to my own version of chicken!)

My brother is responsible for sharing the super simple recipe, found here. Thanks Esteban! We make a half batch most times which still yields plenty. And a great tip of my bro's is to use half of the BBQ sauce initially, shred the meat about 30 minutes before time to eat, then add it back to the crock with the remaining sauce.


 I served this dish as Choo Choo BBQ for big brother's 2nd birthday party and it was a hit in the Dining Car...get it?! We also offered Chugga Chugga Punch. This mommie loves a good theme! For more on the Train Party, head here and here.
 
Happy holiday weekend everyone! Hopefully I'll have baby news to share soon...or lots more nesting projects!


Friday, May 20, 2011

Birthday Beach Towels

We celebrated a couple of birthdays this week, so here's a peek at our friends' personalized beach towel gifts!

A mermaid towel for Julia:
Photobucket
Easy Font in Monogram Wizard Plus

And a handsome striped towel for James:
High Pockets Font in Monogram Wizard Plus

Now to ponder when our May baby will arrive...could be any day now! :)


Tuesday, May 17, 2011

Nursery Artwork

The clock is ticking and my nesting instincts are raging. If only I could bottle this creative energy - I would love to take a sip during the upcoming newborn sleepless nights we are about to encounter!

In our baby boy nursery, we had a sweet collection of turtle prints:
For baby girl, we decided to keep the same frames, but paint them white. My sweet husband handled the priming and painting, so I was free to create the new art work. Our yard is full of nesting birds, so it seemed perfect to use them in our nest!
This adorable birdie is from Planet Applique.  At first we contemplated using 4 different birds, but in the end we decided to go with 4 of the same, all made out of different coordinating fabrics from my stash. One is even made with a swatch of nursery curtains from big brother's nursery!

The following "after" pictures aren't nearly as bright and crisp as I'd prefer, but I'm up against the clock and wanted to share a peek. I'm really pleased with the results and look forward to introducing our girl to her home any day now!
Even if you don't own an embroidery machine, there are a couple of cute bird templates here and here. Fabric is such a fun canvas!

Tuesday, May 10, 2011

My DIY Nursery Curtains

In case you happened to miss my decorating train of thought for baby girl's room, you can get caught up here.
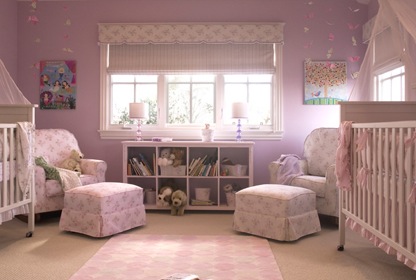
Now for a quick look back at what was hanging before in the baby boy nursery:
These were mommie made by my mommie, also known affectionately as "Mi" by big brother. It was bittersweet taking them down, but I've tucked them away, and hope to put the material to good sentimental use someday.

I'm a girl that likes to have a pattern to start with, so I did some online research to see if anything existed along the lines of my vision. The closest pattern I found was view A of McCalls 6093. It's a box valance meant to be board mounted, but the paper pattern was perfect for my fabric and lining. All I needed to add was a rod pocket - easy!
I can't help but giggle at the "Home Dec in a Sec" tagline they use on the envelope. Is DIY home decor truly possible in one second?! Not at my house.

After selecting and preparing my fabric, I measured both rod sections over the connecting windows to determine my custom panel widths. Turns out they were not exactly equal...gotta love older homes! Each panel was cut on a fold, so I made sure to carefully line up my stripes which is always a bit daunting. Luckily the pattern repeats easily, and the lining is solid. Next I lined up the pattern fold line at the appropriate half-width (including seam allowances) and got to pinning. To create the a-line on each side of the treatment, I used a fabric marker to draw a slant edge from pattern top to bottom, shown here:
I first extended the bottom cut line
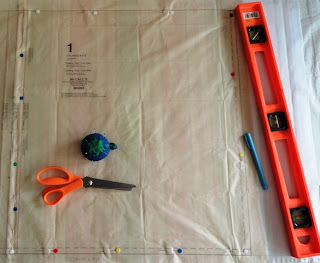
and connected to the top cut line with a straight edge.

I always feel so accomplished once a project is cut out, don't you? Most of the logistics are finally figured out, and it seems at least half, if not more, of the battle is over. Finally time to get sewing!

Right before my first stitch, I draped the cut striped panels over the rods to determine matched placement of the inner middle seams. Even though I cut both panels with a-lines on each side (due to the fold), I wanted them to look continuous despite the small middle rod brace. Hopefully I'm making sense here! I marked each panel at a desired stripe near the brace, placed right sides together with my lining, and followed the mark sewing up a straight seam. Then I figured out exactly how much of a seam allowance I needed to carefully take on the a-line side. The goal was for the panel to hang perfectly flat across the rod. After ensuring I had sewn both side seams correctly, I cut the inner straight seam's a-line excess off. Unturned edges shown below:
I hemmed each panel thereafter, turned them right side out and pressed. Almost done!

Lastly I needed to create the rod pocket. I folded the open top down 1/4", pressed, and then folded and pressed down another 2". I sewed a straight seam across the lower pressed edge. Done! Time for their debut!

I'm really pleased with the results of the these simple, classic curtains. They even inspired me to deep clean the blinds, windows, trim and sills. If only I could bottle this nesting energy! I hope my how-to ramblings made sense - thanks for following along or at least trying to!


Tuesday, May 3, 2011

Making Over The Nursery

As soon as we found out baby #2 is a girl, I immediately started looking around for nursery inspiration. Luckily we already have big brother's essentials...crib, dresser / changing table, and glider. All are white to match the room's trim, and the walls are a neutral tan. Gotta love the practical (yet stylish!) minds of crafty, frugal parents!

My first find for the updated room was crib bedding. I landed an amazing Dwell Studio boutique set (now discontinued) from Craigslist of all places! I was immediately drawn to the modern and fresh alternating patterns:
 
 Next I began to think about curtains. With the bedding so strong on print, I wanted to keep the window treatment style clean and simple. Below are two of my favorite inspiration photos. Both showcase basic toppers that are classic and feminine: 
via Cheap & Chic Nursery and Me and Wee
via Celebrity Babies

Then it was time to find a fabric that would tie in the bedding with our glider cushions and various other accesories. Light green was a main color in baby boy's nursery, so my mother and I selected this print at Mary Jos to tie the new room together:
Down the Road by Waverly

I've been working on the curtains in stages over the past couple of months, so I'm excited to finally reveal baby sister's mommie made creations. A simple a-line look - LOVE!
Freshly pressed and hung today!
I'm tickled pink with the results (couldn't help myself with that one!), and look forward to sharing the curtain how-to soon. Stay tuned for more on the nursery transformation as this mommie bird nests away!

Sunday, May 1, 2011

Boppy Cover

Photobucket
Boppy Covers are a super easy and fun nesting project. I purposely bought a Naked Boppy back before my son was born just so I could sew my own unique covers. Naturally on top of my project list for baby girl was a new mommie-made cover just for her!
Photobucket
Isn't the pale pink, gray and white sweet?!

Inspired to make your own?! This printable pattern via Scribd (which no longer appears to link to a current blog) includes instructions and is a fantastic reference for all sewing levels:
Photobucket

Once assembled, I found the pattern to be a bit large, so I made my own that falls somewhere between it and my actual pillow. Then I cut my fabric, placed the zipper and got stitching. It comes together SO quickly!

I also suggest adding some top stitching to reinforce the zipper ends once you've turned the cover right side out:
Photobucket

And there you go - a personalized cover!
Soft, sweet and simple. 
Photobucket

The countdown is on with less than 30 days to go until we meet our girl. Wow! Guess I need to pack my bag and stack this necessity right on top. But for now, back to nesting with more crafty posts to follow!

LinkWithin

Related Posts with Thumbnails